nengi Basics 2: Entities
Previous: nengi Basics 1: Messages
In this tutorial we will create a networked entity. What is an entity to nengi? Well like a message, it's basicaly keys and values. But entities are long-lived. They have an identifier and they exist within an instance until explicitly removed by your code. For as long as they exist in the instance, the instance will keep their state synchronized with all clients that can see the entity. The entity is perhaps the most powerful idea in nengi in terms of functionality and speed of development.
Let's begin with fresh code: git pull and git checkout basics-2.
Also start that game up with npm start
We're going to create an entity that will become the controllable player character.
Defining an Entity
Create a new file in the common directory called PlayerCharacter.js:
import nengi from 'nengi'

class PlayerCharacter {
    constructor() {
        this.x = 50
        this.y = 50
    }
}

PlayerCharacter.protocol = {
    x: { type: nengi.Number, interp: true },
    y: { type: nengi.Number, interp: true }
}

export default PlayerCharacter
This entity has just x and y for properties. In the protocol you may have noticed the new syntax and the appearance of interp. This variable defines whether the property will be interpolated (smoothed visually). We generally want anything that is supposed to appear as smooth movement to be interpolated.
It is also worth mentioning that when an entity is added to an instance, the instance will assign it a nid and a ntype. These two properties are used to identify the entity internally by nengi.
Let's not forget that we must add this entity to the nengiConfig.js:
import nengi from 'nengi'
import NetLog from './NetLog.js'
import PlayerCharacter from './PlayerCharacter.js'

const config = {
    UPDATE_RATE: 20,

    ID_BINARY_TYPE: nengi.UInt16,
    TYPE_BINARY_TYPE: nengi.UInt8,

    ID_PROPERTY_NAME: 'nid',
    TYPE_PROPERTY_NAME: 'ntype',

    USE_HISTORIAN: true,
    HISTORIAN_TICKS: 40,

    protocols: {
        entities: [
            ['PlayerCharacter', PlayerCharacter]
        ],
        localMessages: [],
        messages: [
            ['NetLog', NetLog]
        ],
        commands: [],
        basics: []
    }
}

export default config
Using the Entity
As before, let's open up gameServer.js, and create this entity when a player connects.
import nengi from 'nengi'
import nengiConfig from '../common/nengiConfig.js'
import instanceHookAPI from './instanceHookAPI.js'
import NetLog from '../common/NetLog.js'
import PlayerCharacter from '../common/PlayerCharacter.js'

const instance = new nengi.Instance(nengiConfig, { port: 8079 })
instanceHookAPI(instance)

/* serverside state here */

instance.on('connect', ({ client, callback }) => {
    /* client init logic & state can go here */
    callback({ accepted: true, text: 'Welcome!' })
    instance.message(new NetLog('hello world'), client)
    const entity = new PlayerCharacter()
    instance.addEntity(entity)
})

instance.on('disconnect', client => {
    // disconnected
})

/* on('Command:AnyCommand', ({ command, client }) => { }) */

const update = (delta, tick, now) => {
    instance.emitCommands()
    /* serverside logic can go here */
    instance.update()
}

export {
    update
}
So now our server will create a PlayerCharacter entity and add it to the instance. But this is missing a lot of functionality. It won't remove the entity when the client disconencts, and it also doesn't associate the entity with the client in any way that we can use. We'll work on both of those things, but first let's get the entity rendered on our game client.
Now I've cheated a little bit because I left playerHooks.js checked into the repo, and this code is already expecting the client to receive a PlayerCharacter for the sake of making this tutorial a bit shorter. Next time we'll re write one of these nengi-hooks style files together. In any case, we're just going to create some really simple graphics and wire it up to these hooks.
Open the clientside graphics folder and createa file called Player.js:
import { Container, Graphics } from 'pixi.js'

class Player extends Container {
    constructor() {
        super()

        const circle = new Graphics()
        circle.beginFill(0xffffff)
        circle.drawCircle(0, 0, 25)
        circle.endFill()
        this.addChild(circle)
    }
}

export default Player
This is PIXI code that creates a Container and then creates some circle graphics inside of it. Why create the container? Why not *just* create the circle? Honestly that would work fine, too. But spoiler alert, we'll be adding more stuff in here later. We still need to wire up the player hooks to use these graphics whenever a PlayerCharacter is created.
Open and modify playerHooks.js:
import Player from '../graphics/Player.js'
import renderer from '../graphics/renderer.js'

export default (state) => {
    return {
        create({ data, entity }) {
            const graphics = new Player()
            renderer.middleground.addChild(graphics)
            return graphics
        },
        delete({ nid, graphics }) {
        },
        watch: {
        }
    }
}
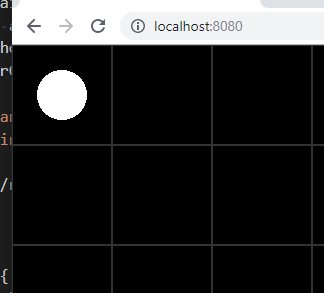
We are going to write our own hooks in a later tutorial, but let's talk about these hooks here for a moment. The hooks api automatically creates, deletes, and updates entities on the clientside and then provides us some "hooks" if we want to react to any of these events in special way. In the case of the code we've just added above, we are "reacting" to a PlayerCharacter being created by creating our own clientside Player graphics (the white circle). So whenever a PlayerChracter is created, we should expect the game client to draw a white circle. Infact, this should already work.
Refresh http://localhost:8080, we should see this:
Just to show off this entity before we make it controllable, let's add some movement and see what is like to have a bit of serverside logic. I also mentioned earlier that we were creating them every time a client connects but not cleaning them up when the client disconnects. Let's address all of that! First, let's just see the movement by adding this code to gameServer.js:
import nengi from 'nengi'
import nengiConfig from '../common/nengiConfig.js'
import instanceHookAPI from './instanceHookAPI.js'
import NetLog from '../common/NetLog.js'
import PlayerCharacter from '../common/PlayerCharacter.js'

const instance = new nengi.Instance(nengiConfig, { port: 8079 })
instanceHookAPI(instance)

/* serverside state here */
const entities = new Map()

instance.on('connect', ({ client, callback }) => {
    /* client init logic & state can go here */
    callback({ accepted: true, text: 'Welcome!' })
    instance.message(new NetLog('hello world'), client)
    const entity = new PlayerCharacter()
    instance.addEntity(entity)
    entities.set(entity.nid, entity)
})

instance.on('disconnect', client => {
    // disconnected
})

/* on('Command:AnyCommand', ({ command, client }) => { }) */

const update = (delta, tick, now) => {
    instance.emitCommands()
    /* serverside logic can go here */
    entities.forEach(entity => {
        entity.x += 1
    })
    instance.update()
}

export {
    update
}
This does the following:
- creates a new collection
const entities = new Map() - adds the entity to it
entities.set(entity.nid, entity) - and then in the update loop, moves each of these entities to the right by 1 pixel per tick
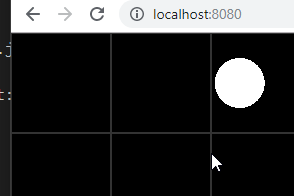
If we refresh our browser we'll see that it's alive!
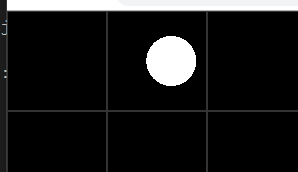
Unfortunately if we refresh multiple times we'll see that each time we connect a new circle is spawned at 50, 50 and continues to drift off towards the right until it gets stuck.
This is for the aforementioned reason that we weren't removing any of these entities when the player disconnects. So first off, let's associate the entity with the the client who spawned, and second let's remove it when that client disconnects. In the interest of space we will be looking at subsections of gameServer.js (mind the line numbers!).
instance.on('connect', ({ client, callback }) => {
/* client init logic & state can go here */
callback({ accepted: true, text: 'Welcome!' })
instance.message(new NetLog('hello world'), client)
const entity = new PlayerCharacter()
instance.addEntity(entity)
entities.set(entity.nid, entity)
client.entity = entity
})
instance.on('disconnect', client => {
entities.delete(client.entity.nid)
instance.removeEntity(client.entity)
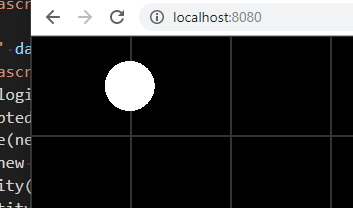
})Refreshing now looks better.
We also need to remove the graphics from the client when the entity is destroyed, by using the delete hook in playerHooks.js:
delete({ nid, graphics }) {
    renderer.middleground.removeChild(graphics)
},
Now everything should be nice and tidy, we can even open multiple browsers and confirm that each client appears at one white circle spawning at 50, 50 which travels to the right (positive x direction) until it disappears. We'll talk about why that disappears in a later tutorial where we learn about culling and views.

Let's summarize what we've done.
- Define a new entity called
PlayerCharacter - Define circle graphics called
Player - Add
PlayerCharactertonengiConfig.js - Hook up
PlayerCharacterso that its graphics (Player) appear/update/disappear on the client - Create a
PlayerCharacterfrom the instance'connect'handler and associate it with a client - Remove the
PlayerCharacterassociated with a client on'disconnect' - Implement some serverside logic that makes all
PlayerCharacters move to the right constantly
In the next tutorial we'll gain the ability to actually control this entity instead of having it on a set trajectory. We're so close to having an actual game!